When you’re pregnant, there are all of these silly ways to try and determine what gender you’re having. You can try to predict the gender using a Chinese gender chart and there are quizzes all over the internet with questions like, “do you prefer sweet or salty treats?”, “does your leg hair grow back more slowly or faster after shaving?”, “do you like the heel of bread?” What any of these things have to do with whether you’re carrying a bouncing baby boy or a little princess is beyond me…but they’re fun to take 😉
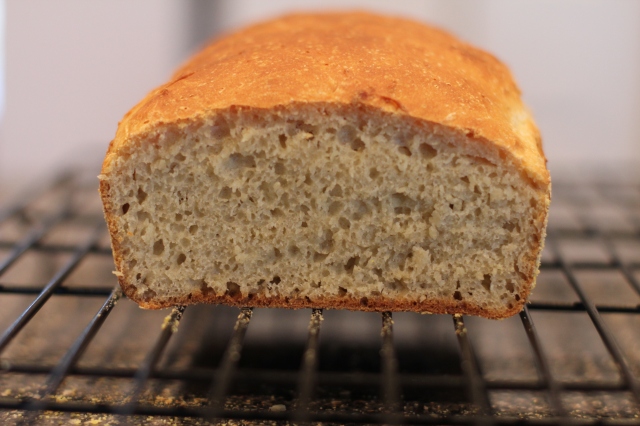
Whether I’m pregnant or not, the answer to “do you like the heel of the bread?” is always a resounding, “no!” I look at the heel of the bread as just a protective layer for the rest of the bread. It’s job is solely to keep the rest of the bread from drying out. I enjoy a thin layer of crust around my bread but I don’t always eat that, either. Yes, I’m still a 5-year-old at heart that would rather not eat the crust of her sandwiches. Until now…until this bread!
I have been on a real bread-making kick. I do it all by hand…mix the ingredients with a spoon, knead it, and shape it into loaves. I have the appliances that could do this stuff for me but, hey, it’s a good arm workout and I find it relaxing and the result most often rewarding and delicious. I’m also too lazy to drag these things out but I didn’t know I’d be into bread-making this much so I think it’s high time I do so 🙂
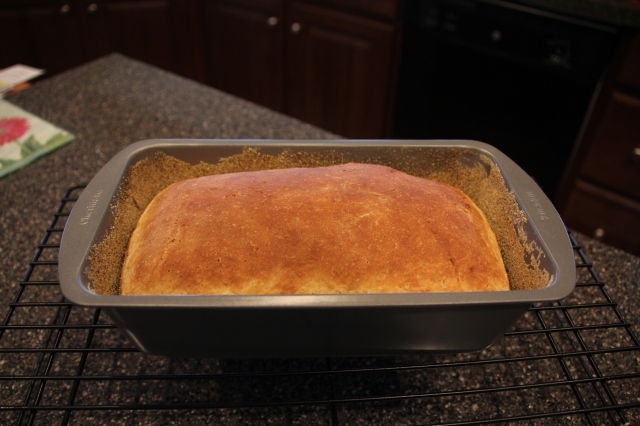
I use King Arthur Flours and this is the third recipe from their site that I have made. Recently, I made their Vermont Whole Wheat Oatmeal Honey Bread – that was delightful. I have also made their Classic 100% Whole Wheat Bread two ways; following the original recipe and then using their suggestion of substituting some orange juice for some of the water (I liked it the second way better). Today, I made the English Muffin Toasting Bread…and I ate the heel…and it was wonderful!
Another plus to this bread, besides it’s wonderful taste, is that it is so easy! Mixed the dough with a hand mixer (should have used my stand mixer with paddle attachment – gonna have to dig some dough out of my hand mixer), spooned it into the prepared pan and let it rise once. My bread did not rise as much as the recipe said it would but this was not the recipe’s fault – I made changes. Even with the changes and a not-so-tall loaf, this is still my favorite bread that I’ve made so far. There will be others though! I already have one in mind that I want to try next 🙂
English Muffin Toasting Bread
Ingredients
- 3 cups King Arthur Unbleached All-Purpose Flour*
- 1 tablespoon sugar
- 1 1/2 teaspoons salt
- 1/4 teaspoon baking soda
- 1 tablespoon instant yeast**
- 1 cup milk
- 1/4 cup water
- 2 tablespoons vegetable oil or olive oil
- cornmeal, to sprinkle in pan
Directions
1) Whisk together the flour, sugar, salt, baking soda, and instant yeast in a large mixing bowl.
2) Combine the milk, water, and oil in a separate, microwave-safe bowl, and heat to between 120°F and 130°F***. Be sure to stir the liquid well before measuring its temperature; you want an accurate reading. If you don’t have a thermometer, the liquid will feel quite hot (hotter than lukewarm), but not so hot that it would be uncomfortable as bath water.
3) Pour the hot liquid over the dry ingredients in the mixing bowl.
4) Beat at high speed for 1 minute. The dough will be very soft.
5) Lightly grease an 8 1/2″ x 4 1/2″**** loaf pan, and sprinkle the bottom and sides with cornmeal.
6) Scoop the soft dough into the pan, leveling it in the pan as much as possible.
7) Cover the pan, and let the dough rise till it’s just barely crowned over the rim of the pan. When you look at the rim of the pan from eye level, you should see the dough, but it shouldn’t be more than, say, 1/4″ over the rim*****. This will take about 45 minutes to 1 hour, if you heated the liquid to the correct temperature and your kitchen isn’t very cold. While the dough is rising, preheat the oven to 400°F.
8) Remove the cover, and bake the bread for 22 to 27 minutes, till it’s golden brown and its interior temperature is 190°F.
9) Remove the bread from the oven, and after 5 minutes turn it out of the pan onto a rack to cool. Let the bread cool completely before slicing.
*I replaced 1/2 c. of the unbleached all-purpose flour with white whole wheat flour.
**I only had active dry yeast (I really have to get some instant yeast, too).
***Since I was using active dry yeast, which calls for lukewarm water between 100-110 degrees, I heated the liquids to 115 degrees in hopes of not ruining the yeast but also making the liquid almost hot enough.
****Another thing I really need to get is a slightly smaller loaf pan because mine is 9″ x 5″. This may not seem like a big difference but it can affect things during rising and baking.
*****Due to the changes I made, different yeast, liquid slightly too warm for the yeast and cooler than what the recipe called for, and a slightly larger pan size, my dough was probably about an inch or so below the rim of the pan.

Normally, I spoon my flour into the measuring cup and level it off. With this recipe, after reading some reviews, I decided to sift the flour before spooning it into the measuring cup and leveling off.


